

How to make a beautiful and delicious Low Carb Charcuterie Board. Also includes tips for putting together boards in general.
This Low Carb Charcuterie Board will wow your guests with its pretty colors and delicious options! Everyone will enjoy the variety of the board and the hostess will enjoy how easy it is to put together!
Whether you are the only one eating Low Carb or serving a whole group of folks watching their carbs, everyone will love the options on this board!
Make a board exactly like the one shown or just get ideas and make one completely different!
Charcuterie Boards are really a super easy way to feed a variety of people. Folks can build their own plate just how they like. Your board should include enough choices that anyone can find things they will like.
One thing about Charcuterie Boards is that no two are exactly alike! Anything goes here! There are no rules!
Get some inspiration from boards you see.
Add more of what you will like.
Don’t add things you don’t like!
It will be your own creation!
If you need a gluten free board, switch out the breads and crackers with gluten free versions.
If you are Vegan, replace animal products with more fruits, vegetables, nuts and seeds.
Other Low Carb Recipes
Best Gluten Free Low Carb Meatloaf
Slow Cooker Pork and Sauerkraut
Slow Cooker Garlic Herb Chicken
Sugar Free Deviled Jell-O Eggs
Low Carb Zippy Horseradish Meat Sauce
Other Charcuterie Boards
How do you even say Charcuterie?
Shar-KOO-tuh-ree
What is a Charcuterie Board?
Wikipedia defines Charcuterie Board as, “A charcuterie board is an appetizer typically served on a wooden board or stone slab that features a selection of preserved foods, especially cured meats or pâtés, as well as cheeses and crackers or bread.[1] While there is a distinction between charcuterie boards and cheese boards, the terms have largely become interchangeable and the difference is merely semantic”.
While I realize Wikipedia is not always deemed most reliable, it did seem to define this accurately.
Nowadays when you look for Charcuterie Board ideas you can find boards full of any variety of foods and any theme. It doesn’t even have to contain meat at all. It could be vegan or even all candy or breakfast theme.
And in this case, it can easily be a wonderful board full of Keto options!
Sometimes they will be called a “Snack Board” and other times they will be still called a Charcuterie Board. While some of these are not technically a Charcuterie Board, the idea is there so the name is still used.
What Kinds of Foods Do You Add to a Charcuterie Board?
You want your Charcuterie Board to have lots of variety.
Include different flavors, textures and appearances.
You want it to be pretty and interesting to the eyes and mouth.
Add things to your board that taste sweet, savory, salty and spicy.
You should have soft and crunchy items on your board.
The more variety, the better!
When Would You Serve a Charcuterie Board?
Really, when ISN’T a good time for a Charcuterie Board?
It is a great appetizer, snack, light meal or even side dish.
That makes a Charcuterie Board ideal for New Year, Game Day, Valentine’s Day, Easter, Mother’s Day Brunch, Graduation, Memorial Day, 4th of July, Labor Day or any picnic, Halloween, Thanksgiving, Christmas, Sunday Brunch or any family get-together.
We have had our own version of a Charcuterie Board for years and called it a nibble platter. We didn’t even know we were so ahead of the times! I would make some soup and put summer sausage, cheeses, crackers, nuts, fruits, vegetables, dressing and whatever else I wanted to be eaten up out of the cabinet or refrigerator on plates and put it all on the table for all of us to just go at it. It was such a nice, easy meal and we loved it! That was 20 years ago! 😊
How much do I need per person?
When serving meats and cheeses, plan for 3-4 ounces of combined meat and cheeses per person when it is being used as a side dish or appetizer.
If you are using it as more of a main dish, you will want 6-8 ounces total combined per person.
Use the meat and cheese combined serving as a starting point and then add the other foods from there. That will give you a good idea.
How long can a charcuterie board sit out?
Your charcuterie board should not sit out for longer than 2 hours. If it is outside in the heat, that time will be reduced to more like 60-90 minutes tops.
Use your best judgment on how hot it is and keep it as cool as possible. It is not worth your guests becoming sick.
What do you need to Make a Charcuterie Board?
1-A Board, tray or platter to put your foods on.
It can be large or small and any shape you like. Some use a wood board. You can also use a metal baking sheet or marble or stone. Something with edges is ideal to keep the food from falling off but not absolutely necessary.
If you don’t have a board or baking sheet, use several smaller plates or platters.
2-Small bowls, dishes, cups or ramekins. These will hold small things like nuts and olives that may roll around and anything that is liquid. You will put dips, jams, jellies, mustards, etc. in them.
3-Utensils; small spoons for jams jellies, etc. spreaders for soft cheeses, small forks, tongs or toothpicks for meats
4-The food
Can a Charcuterie Board be Made Ahead?
Much of it, yes!
Slice your meats and cheeses ahead of time. They can go into Ziploc bags to stay fresh.
Cut vegetables and put into Ziploc bags.
Add spreads, nuts, olives, etc. to bowls. Cover with plastic wrap and refrigerate if needed.
You can even wrap the entire board in plastic wrap and store it in the refrigerator several hours ahead of time. When it’s time to serve it, remove the plastic wrap and add the fresh berries.
Some Tips
Don’t feel like you need to buy the most expensive meats and cheeses. Boards can be built with just a few inexpensive items. Or buy one or two fancy items and fill in with less expensive things.
Place items that could make other things soggy in bowls; things like olives and pickles.
Arrange items on your board so they are easy to pick up. You don’t want your guests taking a lot of time trying to pick cheese slices apart. It is supposed to be an easy picking board. Fan out meats and cheeses. Or fold meat so it is easy to grab. Pre-cut block cheeses.
Along with things that are easy to pick up off of the board, things should also be easy to eat. Don’t add things that are messy or difficult.
You don’t want your board so full that things will fall off, but you don’t want bare spots so that it looks boring either.
How to Assemble a Charcuterie Board
Sometimes it is helpful to take a piece of paper and jot down where you want things to go. If you are not visual like that and more of a doer, that is good! Go for it!
If you have a whole lot of items though, it may be a very good idea to at least have a list of what you want to go on your board so you don’t forget something in the bottom drawer of the refrigerator.
As with deciding what to put on your board, determining how to build it is up to you. Each board will be just a little different.
Look at what you have and see what makes sense near each other. Meats near the mustard, veggies near the ranch dressing, etc.
You will want to place the largest items first to be sure you have room for them.
You will also want to place the smallest items last as they will fit in the leftover cracks best.
Let’s start assembling!
First add bowls. Those will be your biggest items and focal points.

Put cheese near a bowl with olives or pickles, etc. Keep going with the other bowls.
As you finish with your bowls, you will have fewer items. Just keep adding. If you added too much of something, just take a little bit off.
Lay around your spoons, forks, spreaders, tongs, toothpicks, etc.
Label things if you like. This is helpful if you have things that your guests may not be familiar with. Toothpicks are useful for this.
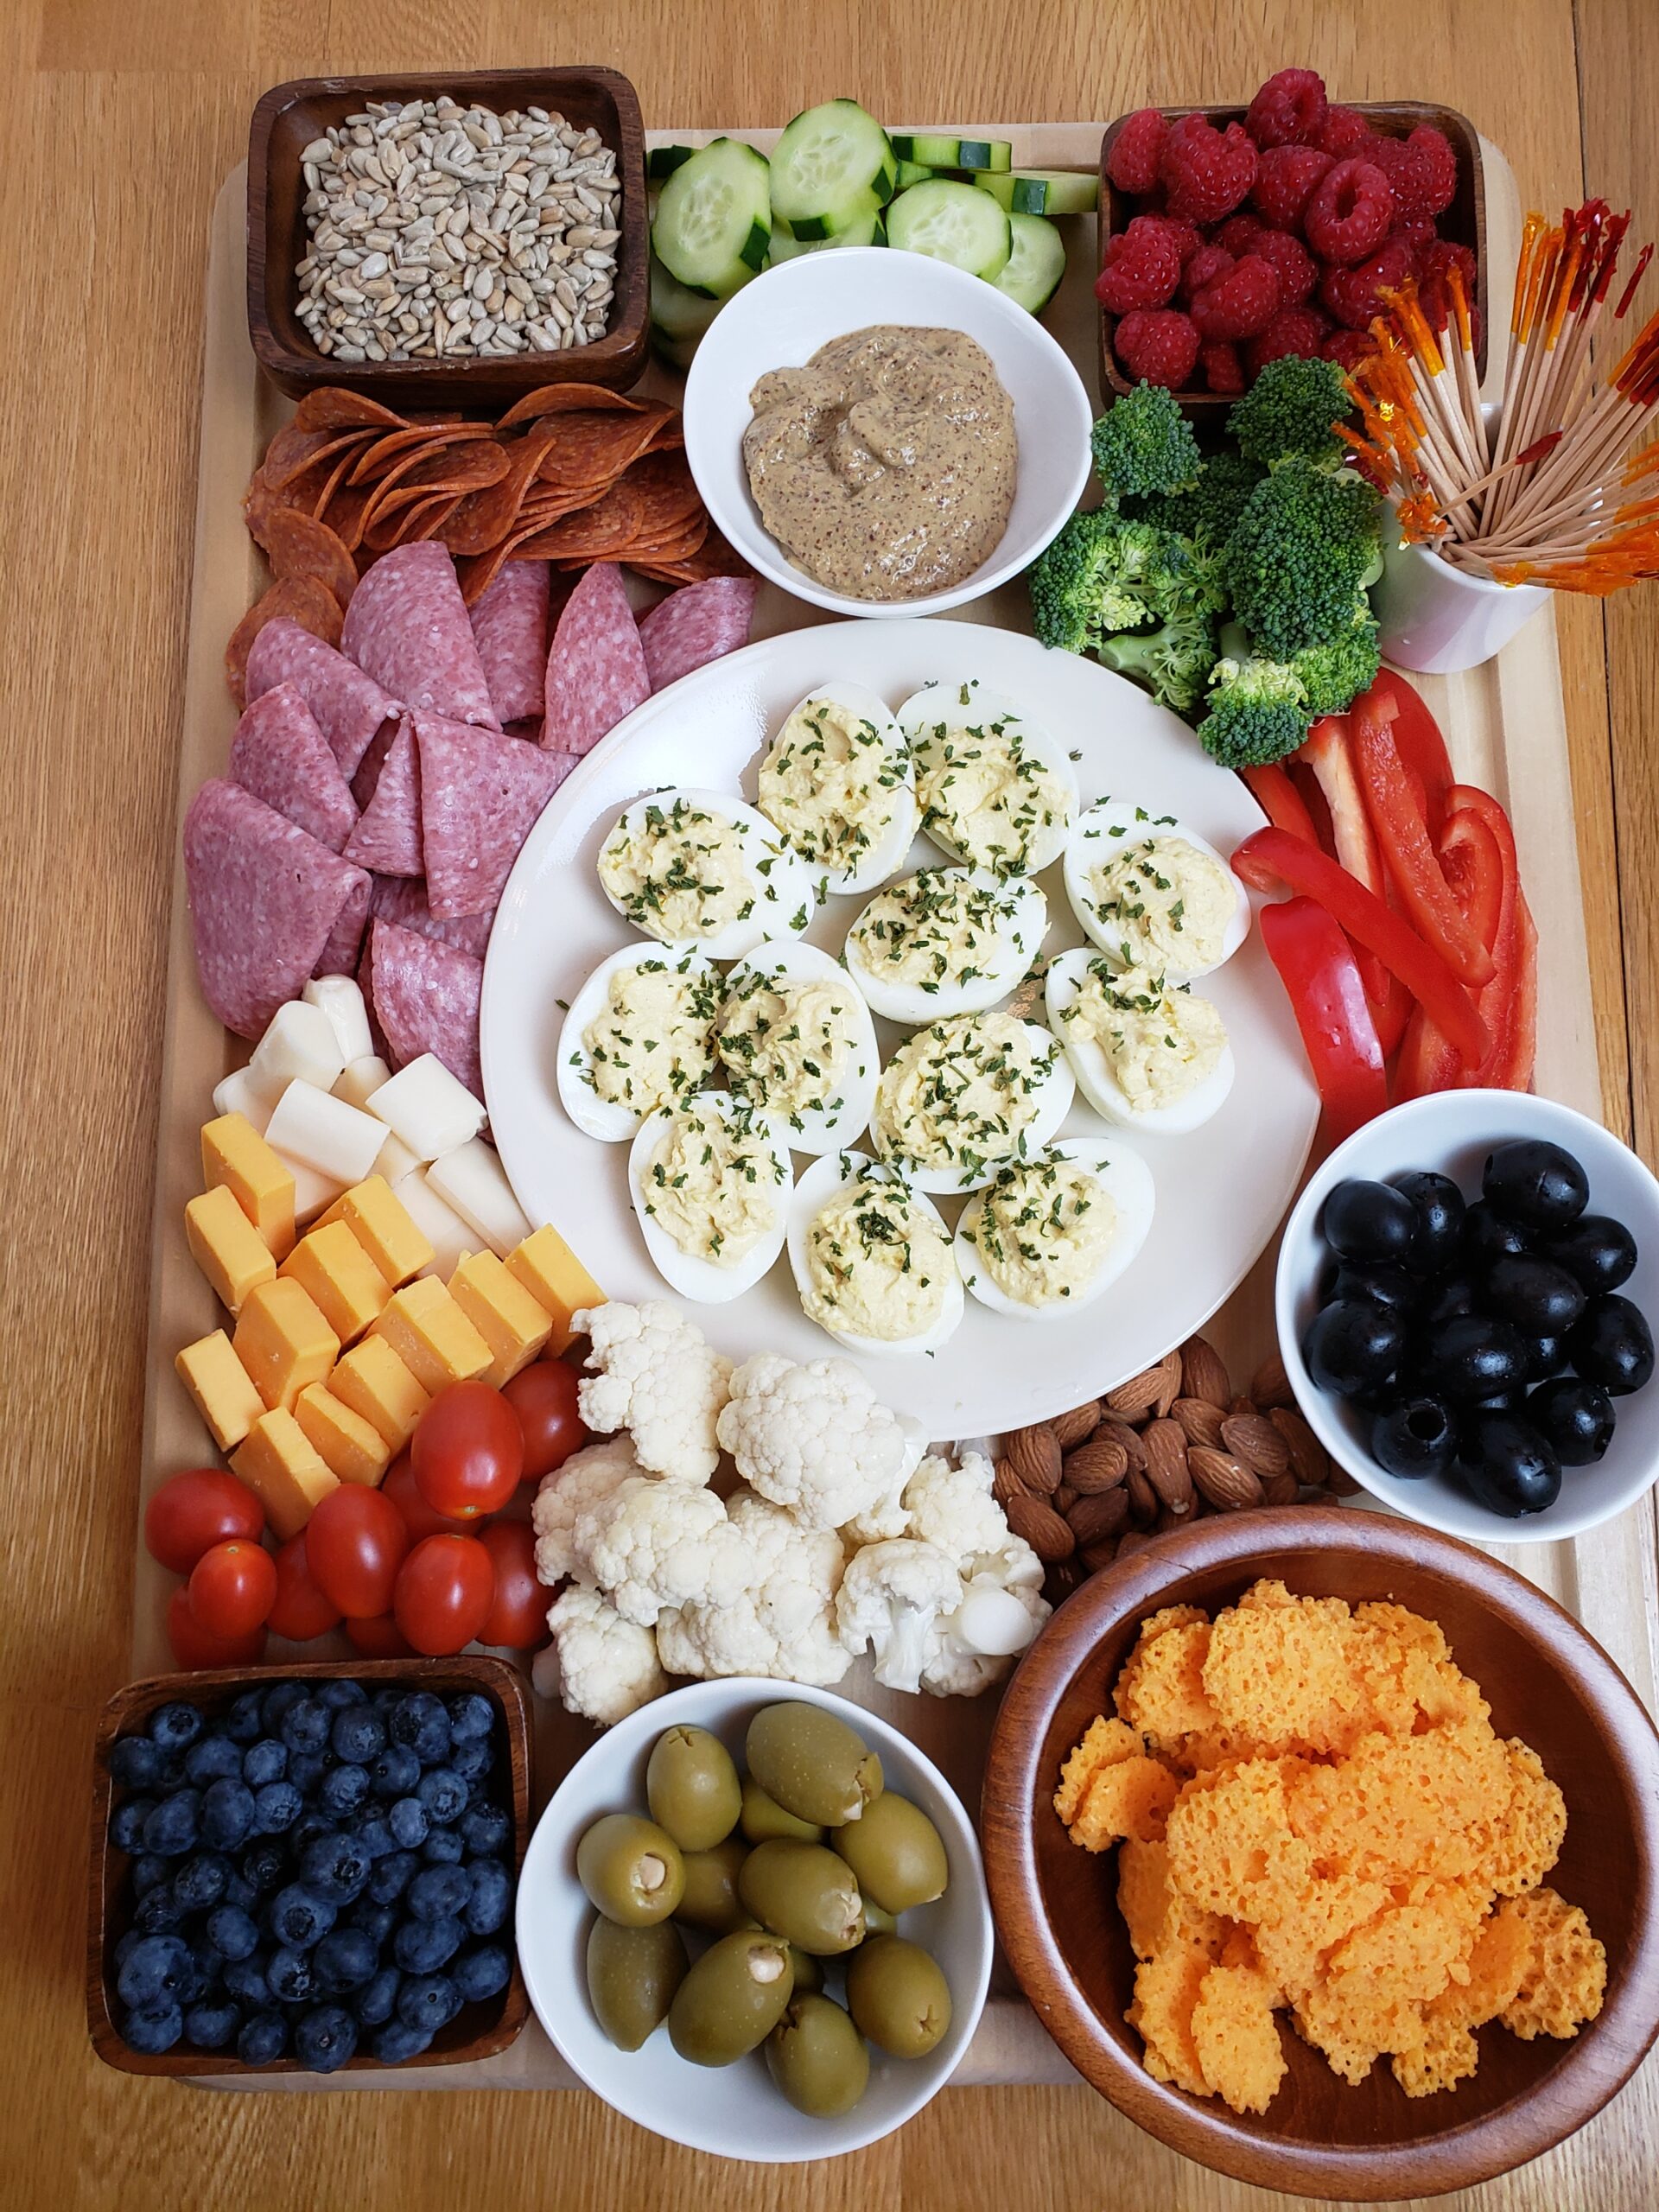
Ingredients on my Low Carb Charcuterie Board

Salami
Pepperoni
Diced Cheeses
Raspberries
Blueberries
Cherry tomatoes
Red bell pepper
Cauliflower florets
Broccoli florets
Sliced cucumber
Spicy brown mustard
Cheese Whisps
Sunflower seeds
Almonds
Black Olives
Garlic Stuffed Olives
If you make it, play it or use it, let me know! Rate it and leave a comment below. I love hearing from you!
Be Sure to Pin so you can find it easily later!

Are you following me on Pinterest? I have been working very hard making new boards I think you will love and am adding dozens of new pins from all of the popular homeschooling websites!
You can also follow me on my Facebook page, Loving Homeschool! I am adding pictures, links and much more than I would on the blog. If you love recipes, come follow my recipe group, Best Recipes you will Want to Make.

Low Carb Charcuterie Board
How to make a beautiful and delicious Low Carb Charcuterie Board. Also includes tips for putting together boards in general.
Ingredients
- Salami
- Pepperoni
- Diced Cheeses
- Raspberries
- Blueberries
- Cherry tomatoes
- Red bell pepper
- Cauliflower florets
- Broccoli florets
- Sliced cucumber
- Spicy brown mustard
- Cheese Whisps
- Sunflower seeds
- Almonds
- Deviled Eggs
- Black Olives
- Garlic Stuffed Olives
Instructions
- First add bowls. Those will be your biggest items and focal points.
- Put cheese near a bowl with olives or pickles, etc. Keep going with the other bowls.
- As you finish with your bowls, you will have fewer items. Just keep adding. If you added too much of something, just take a little bit off.
- Lay around your spoons, forks, spreaders, tongs, toothpicks, etc.
- Label things if you like. This is helpful if you have things that your guests may not be familiar with. Toothpicks are useful for this.
Notes
See the post on the website for many more tips than I can include here.

Cindy
Welcome! I am a wife, mother, mother-in-law, Grammy, daughter, sister, retired homeschooler, writer, recipe inventor, photographer and website content creator
Visit my other website for all kinds of recipes and tips at MyProductiveBackyard.com. Enjoy! 🙂