
17 Reasons Your Tomato Leaves Are Turning Yellow – And The Quick Fix For Each One
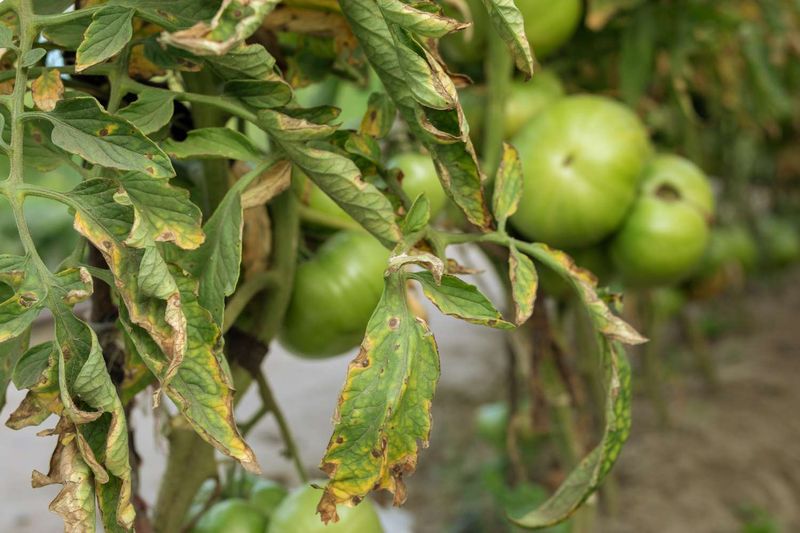
Yellow leaves on your tomato plants are like little notes the plant leaves you, telling you something is off. The tricky part is that many different problems can cause the same yellow color, so figuring out the real reason takes a bit of detective work. The good news is that most causes are easy to spot once you know what to look for, and even easier to fix. Here are 17 reasons your tomato leaves might be turning yellow, plus a simple solution for each one.
1. Nitrogen Deficiency
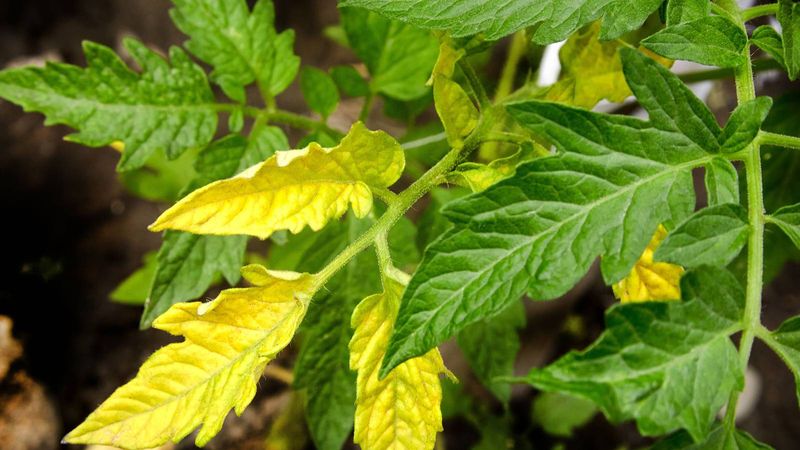
When the oldest leaves at the bottom of your plant fade to a pale, sickly yellow while the new growth up top stays green, hungry roots are usually the culprit. Nitrogen is the nutrient tomatoes crave most for leafy growth, and the plant will actually pull it out of older leaves to feed the young ones.
You will notice the yellowing spreads evenly across the whole leaf rather than in spots or patches. It is one of the most common issues for backyard growers who plant in the same bed year after year without refreshing the soil.
The quick fix is to feed with a balanced or nitrogen-rich fertilizer, such as blood meal or a fish emulsion diluted in water. Go easy though, since too much nitrogen gives you a jungle of leaves and very few tomatoes. Work a light dose into the top inch of soil and water it in, then watch new growth green up within a week or two.
2. Overwatering And Soggy Roots
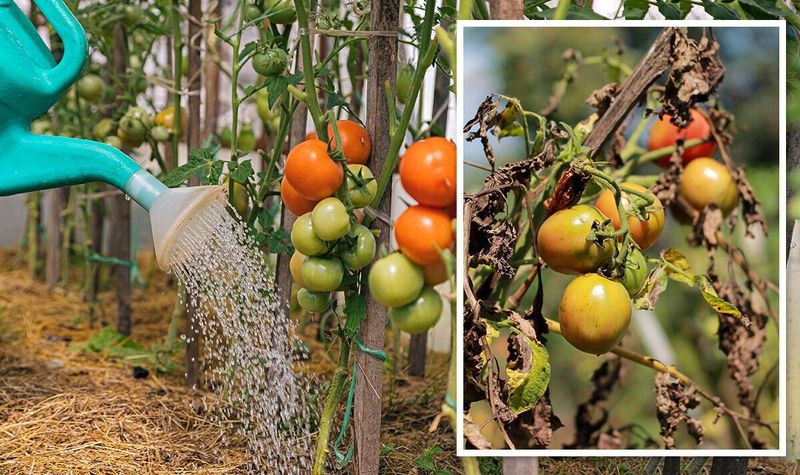
Drowning your tomatoes with kindness is easier than most folks realize. When soil stays waterlogged, the roots cannot breathe, and starved roots quickly send the message upward as yellow, droopy leaves that look almost puffy or swollen.
A classic sign is soil that stays wet days after you last watered, sometimes with a slightly sour smell. Container growers run into this a lot when pots lack good drainage holes.
Back off the watering schedule and let the top inch or two of soil dry out before you water again. Stick your finger in the dirt to check rather than watering on a fixed calendar. For potted plants, make sure water drains freely from the bottom, and if the roots are sitting in a saucer of standing water, empty it out right away.
3. Underwatering And Drought Stress
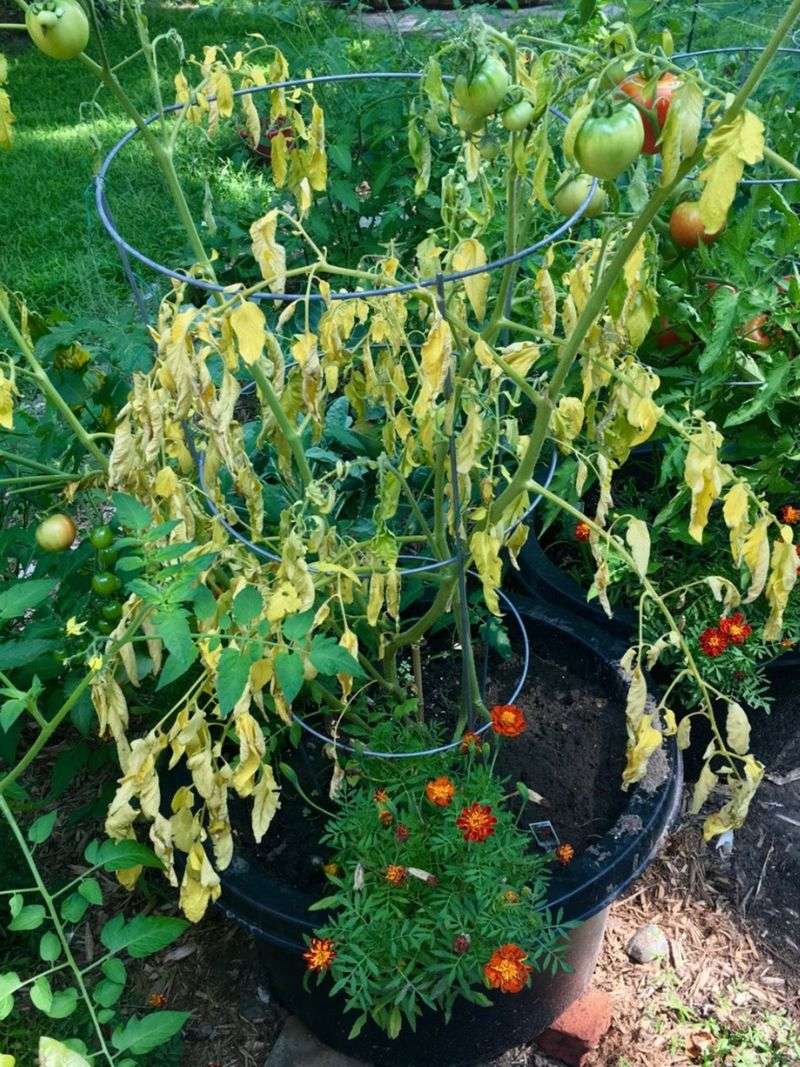
On the flip side, a thirsty tomato plant will also throw yellow leaves, just for the opposite reason. Dry soil forces the plant to ration what little moisture it has, and the lower leaves are the first to be sacrificed, often turning yellow and then crispy at the edges.
You might see the whole plant wilt during the hottest part of the day and perk back up in the evening. If the soil pulls away from the sides of the pot or forms a hard crust, that is a strong hint your plant needs a deeper drink.
Water slowly and deeply so the moisture reaches the deeper roots instead of just wetting the surface. A layer of straw or shredded leaf mulch on top of the soil helps hold moisture between waterings. Getting on a consistent rhythm matters more than the exact amount, since erratic watering stresses tomatoes the most.
4. Magnesium Deficiency
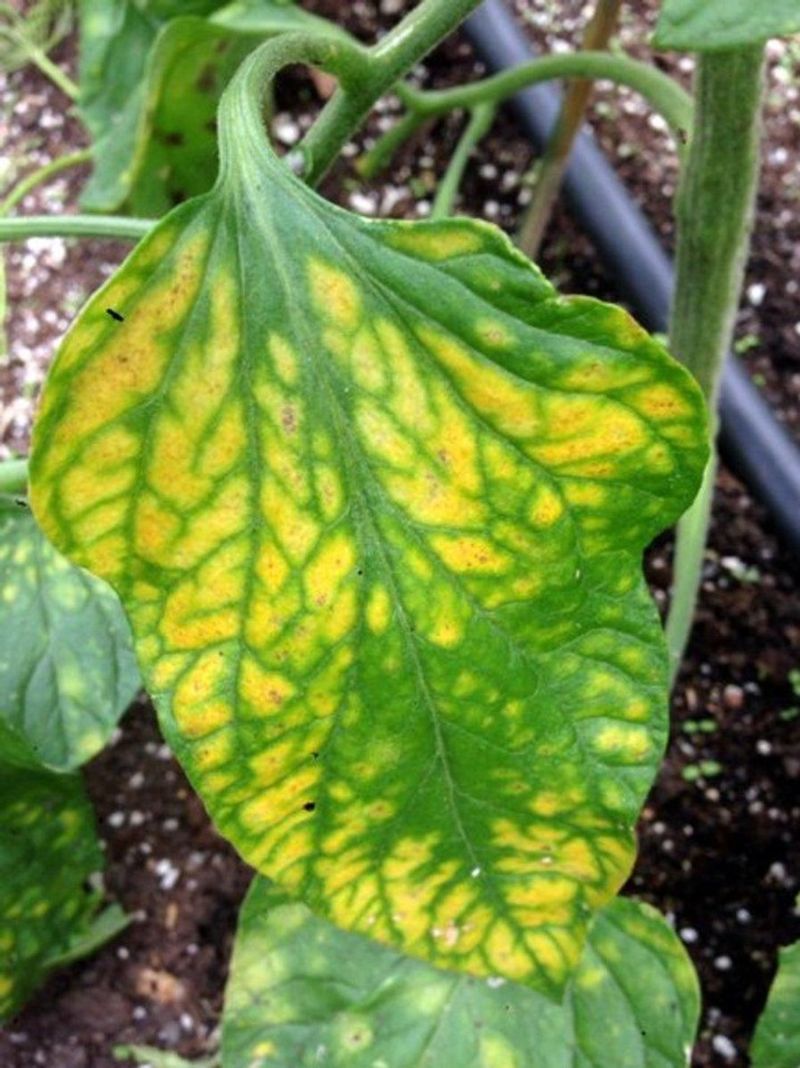
Ever noticed leaves that turn yellow between the veins while the veins themselves stay bright green, almost like a leafy skeleton? That striking pattern is the signature of a magnesium shortage, and it usually shows up on the older, lower leaves first.
Magnesium sits at the center of every chlorophyll molecule, so without it the plant literally cannot make the green pigment it needs. Sandy soils and containers that get watered a lot tend to run low because the mineral washes away.
A gentle fix many gardeners swear by is a foliar spray of Epsom salt, about one tablespoon dissolved in a gallon of water, misted onto the leaves. For a longer-term correction, work some Epsom salt into the soil or add compost rich in organic matter. Improvement in leaf color often shows within a week when magnesium was the real problem.
5. Early Blight Fungus
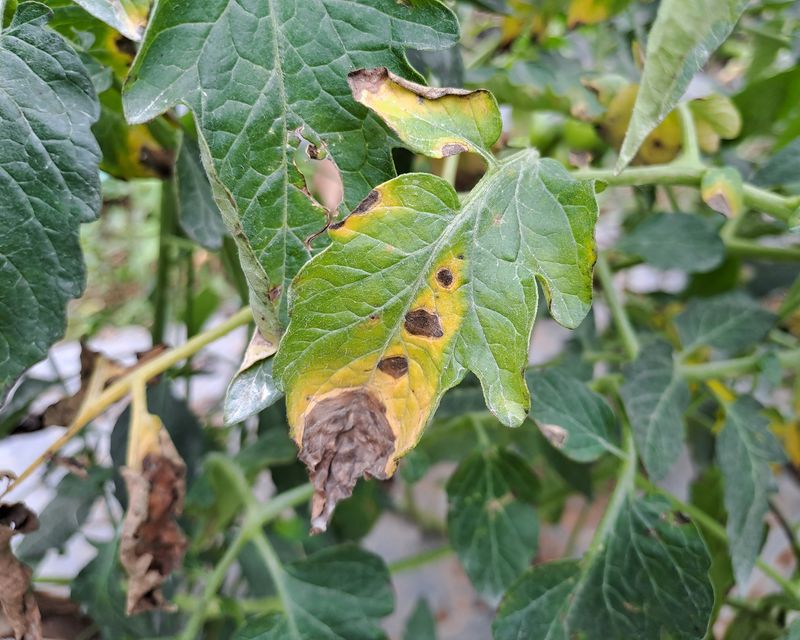
Dark brown spots ringed with concentric circles, almost like a tiny bullseye, surrounded by a yellow halo point straight to early blight. Starting on the lowest leaves, this fungal disease creeps upward as splashing rain and watering carry spores from the soil onto foliage.
Left alone, it can defoliate a plant from the bottom up and sap your harvest. Warm, humid summer weather in most US backyards gives it the perfect conditions to spread.
Snip off and throw away affected leaves right away, and never toss them in the compost pile where spores can survive. Mulching around the base blocks soil from splashing up, and watering at ground level instead of overhead keeps foliage dry. A copper-based fungicide can help slow the spread if you catch it early, and rotating where you plant tomatoes each year keeps the disease from building up in the soil.
6. Compacted Or Poorly Draining Soil
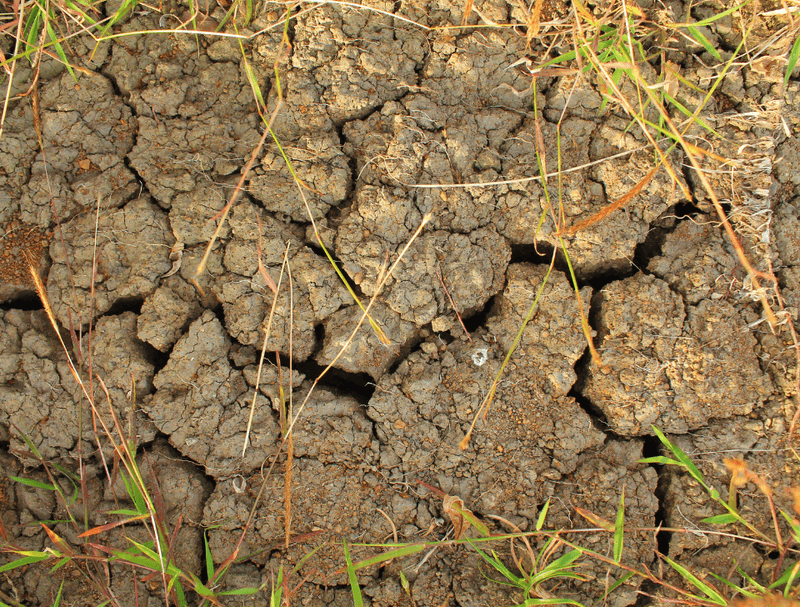
Sometimes the trouble is not what you add but what the roots are stuck in. Hard, compacted soil chokes off air and forces water to pool around the roots, leaving the plant unable to take up nutrients no matter how much you feed it, and the result is stubborn yellowing.
Clay-heavy backyard beds are notorious for this, especially after a season of foot traffic or heavy rain that packs the ground down tight.
Loosen the soil gently around the plant with a hand fork, being careful not to slice into the roots. Mixing in compost, aged manure, or shredded leaves opens up the structure and lets water and air move freely again. If your in-ground bed is truly heavy clay, a raised bed filled with a lighter, well-draining mix can solve the problem for good in future seasons.
7. Too Little Sunlight
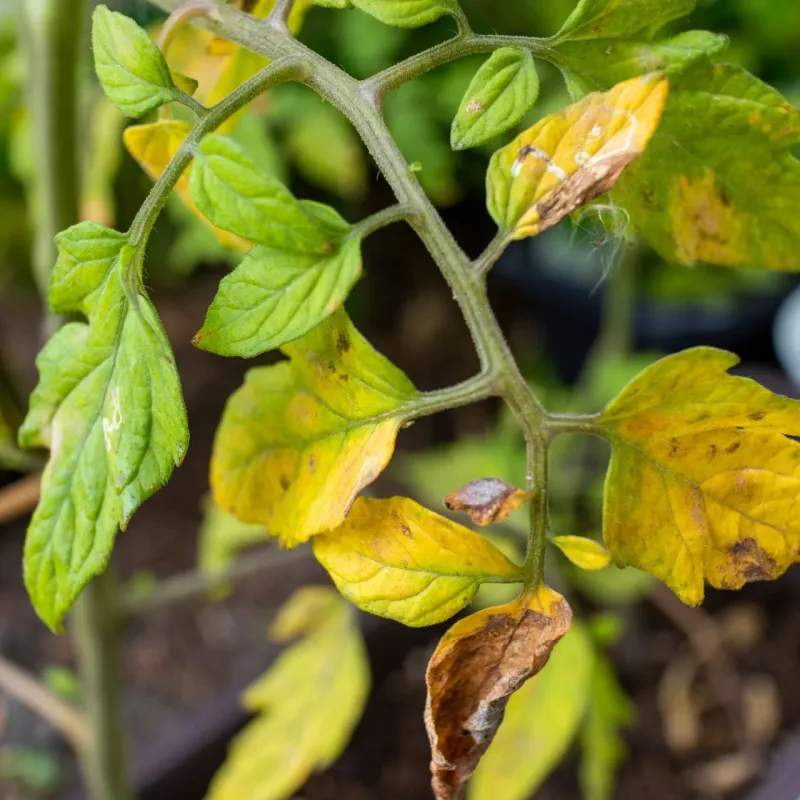
Tomatoes are sun worshippers through and through, and a plant tucked in the shade will slowly go pale and leggy as it stretches for light. Leaves in the shadiest spots turn yellow simply because they are not getting enough light to keep making chlorophyll.
Fun fact: tomatoes want six to eight hours of direct sun a day to truly thrive, which is more than many backyard corners actually offer once trees leaf out in summer.
If your plant is in a pot, the fix is simple: move it to the sunniest spot you have. For in-ground plants, trim back overhanging branches or neighboring plants that cast shade, and prune crowded inner tomato foliage so light reaches the lower leaves. Planning next year’s bed in a brighter location saves you the headache altogether.
8. Iron Deficiency
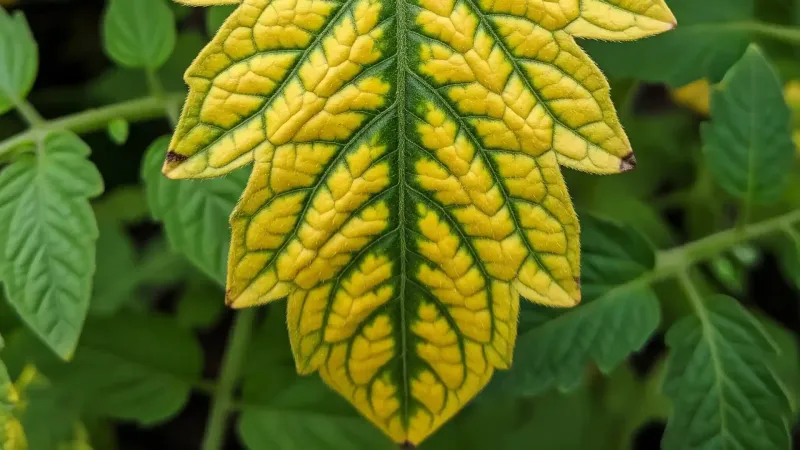
Here is a clue that separates iron trouble from most other shortages: iron deficiency strikes the youngest leaves at the top of the plant first, not the old ones down low. Those new leaves turn yellow between the veins while the veins stay green, giving them a delicate, netted look.
Iron often becomes locked up and unavailable when the soil is too alkaline, meaning the mineral is there but the plant simply cannot reach it.
Test your soil pH, and if it reads above about 7, work in some elemental sulfur or an acidifying amendment to bring it down into the slightly acidic range tomatoes prefer. A chelated iron product watered in or sprayed on the leaves offers a faster rescue while the pH slowly comes into balance. Correcting the underlying pH is what keeps the problem from coming back.
9. Transplant Shock
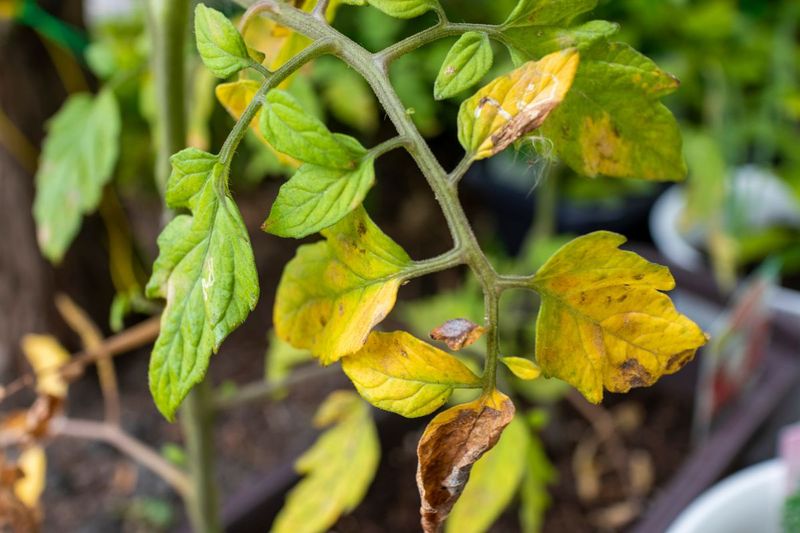
A newly planted tomato that suddenly yellows and sulks is probably just throwing a temporary tantrum. Moving from a cozy pot into the open ground disturbs the roots, and the plant pauses its growth while it settles in, sometimes shedding a few yellow leaves in the process.
Seedlings that were not hardened off gradually to outdoor conditions are especially prone to this brief slump.
Patience is honestly the main cure here. Keep the soil evenly moist but not soggy, give the plant a little shade during the first few blazing afternoons, and hold off on heavy fertilizer until it is clearly rooted and growing again. Within one to two weeks, a healthy transplant usually bounces back and starts pushing out fresh green leaves. Next time, harden off seedlings over a week to make the move easier.
10. Fusarium Wilt
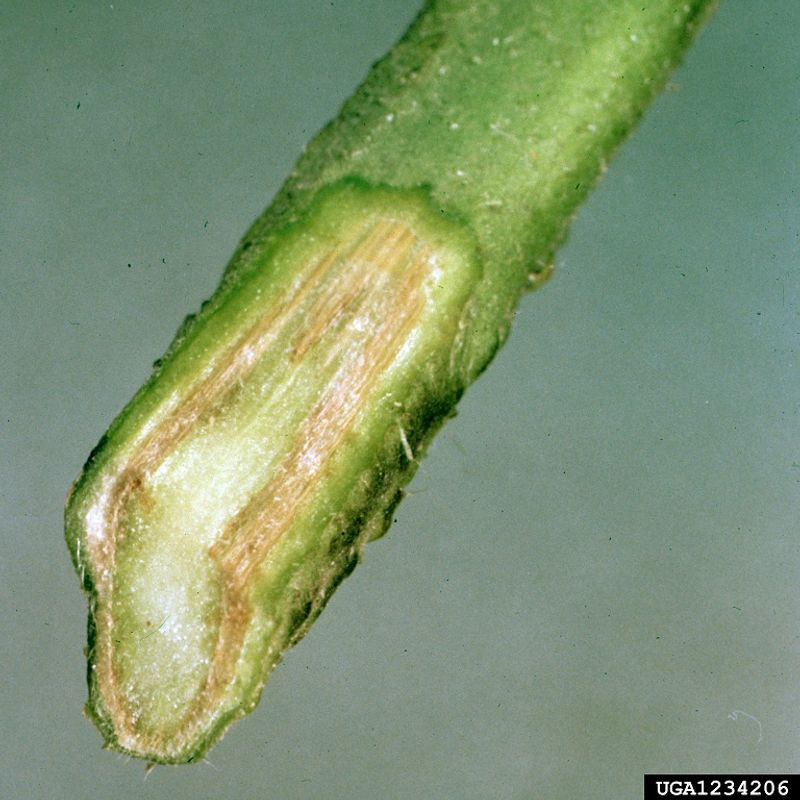
One telltale oddity of fusarium wilt is that it often strikes just one side of the plant, or even one half of a single leaf, leaving the rest looking healthy. Yellowing usually starts low and on one side, followed by wilting that does not recover even after watering.
The fungus lives in the soil and enters through the roots, clogging the plant’s plumbing so water cannot travel up the stem. Slice a stem near the base and you may spot brown streaks inside.
Sadly, there is no cure once a plant is infected, so the best move is to pull and dispose of it before the disease spreads through the soil. Do not compost the plant. Going forward, plant fusarium-resistant tomato varieties, often labeled with an F on the tag, and rotate your crops so tomatoes are not in the same spot each year.
11. Aphid Infestation
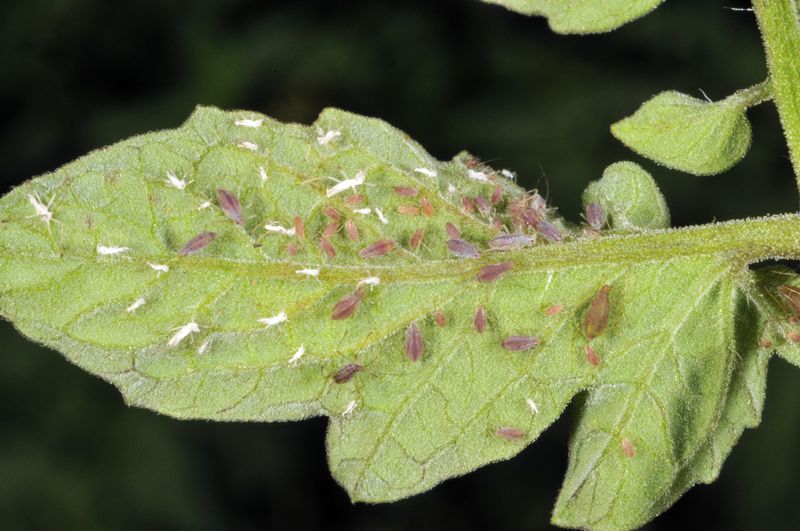
Turn over a yellowing leaf and if you find tiny green, black, or gray specks clustered along the underside, you have met the aphid. These little sap-suckers drain the juices right out of the leaves, leaving them yellow, curled, and sometimes sticky with a residue called honeydew.
A sooty black mold often grows on that sticky honeydew, adding insult to injury, and ants marching up the stem are another giveaway.
Blast them off with a strong spray of water from the hose, which knocks most of the colony to the ground. For stubborn cases, insecticidal soap or neem oil applied to the undersides of leaves can reduce the population. Planting flowers that attract ladybugs and lacewings nearby brings in natural predators, since a single ladybug may eat dozens of aphids a day.
12. Potassium Deficiency
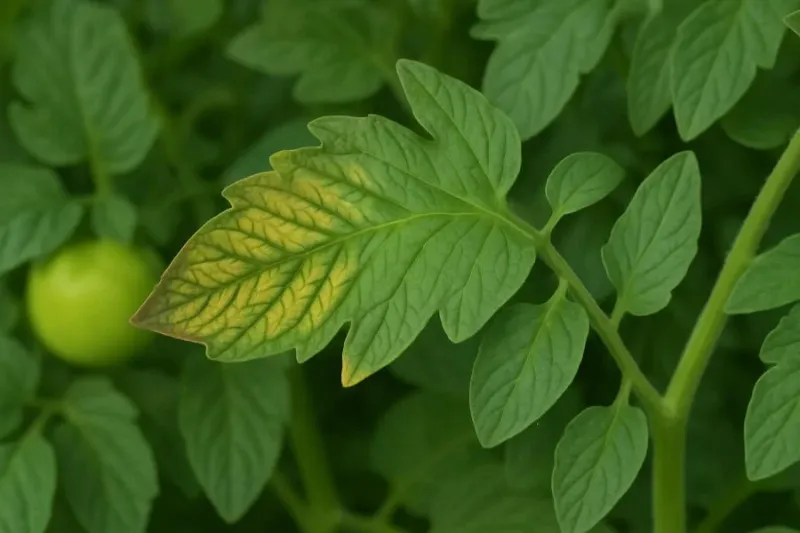
Watch the edges. When the margins of older leaves turn yellow and then scorch brown while the center stays greener, potassium is likely running short. This nutrient helps tomatoes move water and build fruit, so a shortage often shows up alongside blotchy, unevenly ripening tomatoes too.
Sandy soils and heavy fruit loads both drain potassium quickly, leaving the plant stretched thin during peak production.
Feed with a fertilizer that lists a higher middle-and-last number, or work in a potassium source like kelp meal or wood ash used sparingly. Compost also replenishes potassium naturally over time. Because the damaged leaf edges will not turn green again, judge your success by the new growth that emerges healthy and evenly colored after you correct the shortage.
13. Natural Aging Of Lower Leaves
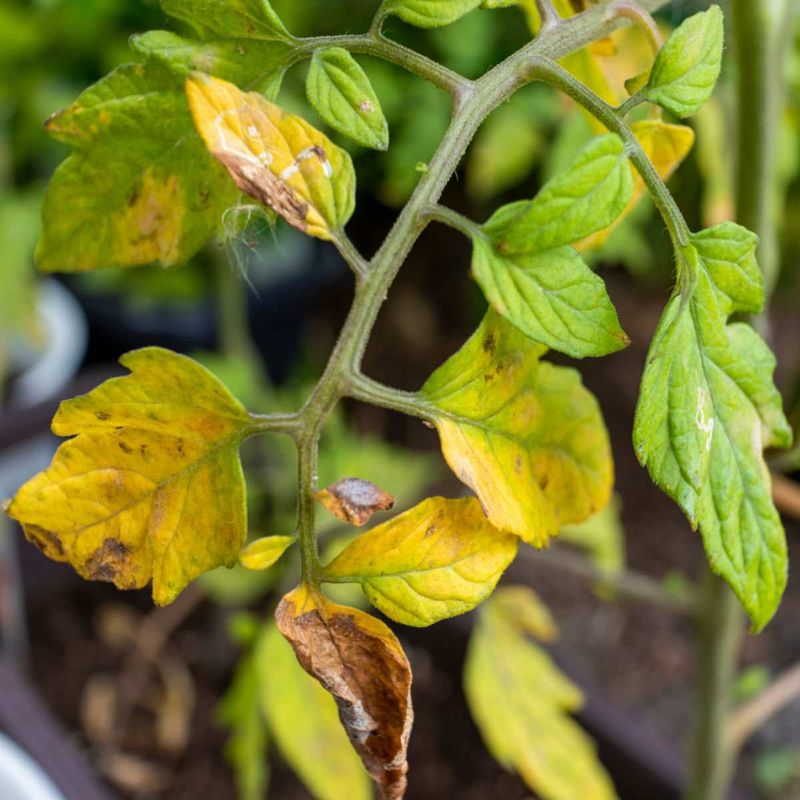
Before you panic and reach for the fertilizer, take a breath and look at where the yellowing is. If it is only a few of the very lowest, oldest leaves gradually going yellow while the rest of the plant looks vigorous and green, this is often just normal aging.
Tomatoes naturally shed their bottom leaves as they grow taller and put energy into the top and into fruit. It is the plant’s way of pruning itself.
The simple response is to pinch or snip off those spent lower leaves, which also improves airflow around the base and reduces the chance of soil-borne disease splashing up. As long as new growth is strong and the yellowing is not creeping upward or spreading fast, there is nothing to worry about. A little tidying keeps the plant looking neat and healthy.
14. Septoria Leaf Spot
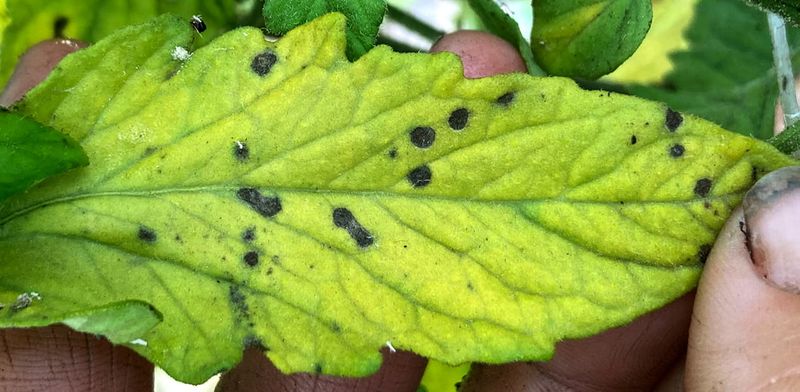
Picture a spray of tiny circular spots with dark brown edges and grayish-tan centers, scattered all over the lower leaves, and each spot ringed by yellowing tissue. That peppered look is the calling card of septoria leaf spot, a fungal disease that loves wet, humid weather.
Unlike early blight’s larger bullseyes, septoria spots are small and numerous, and they can quickly turn a leaf fully yellow before it drops.
Remove infected leaves as soon as you spot them and clear away any fallen debris around the plant. Water at the soil line to keep leaves dry, space plants for good airflow, and mulch to stop soil splash. A fungicide labeled for septoria can help protect the remaining healthy foliage. Cleaning up thoroughly at the end of the season keeps spores from overwintering in your garden.
15. Cold Temperature Stress
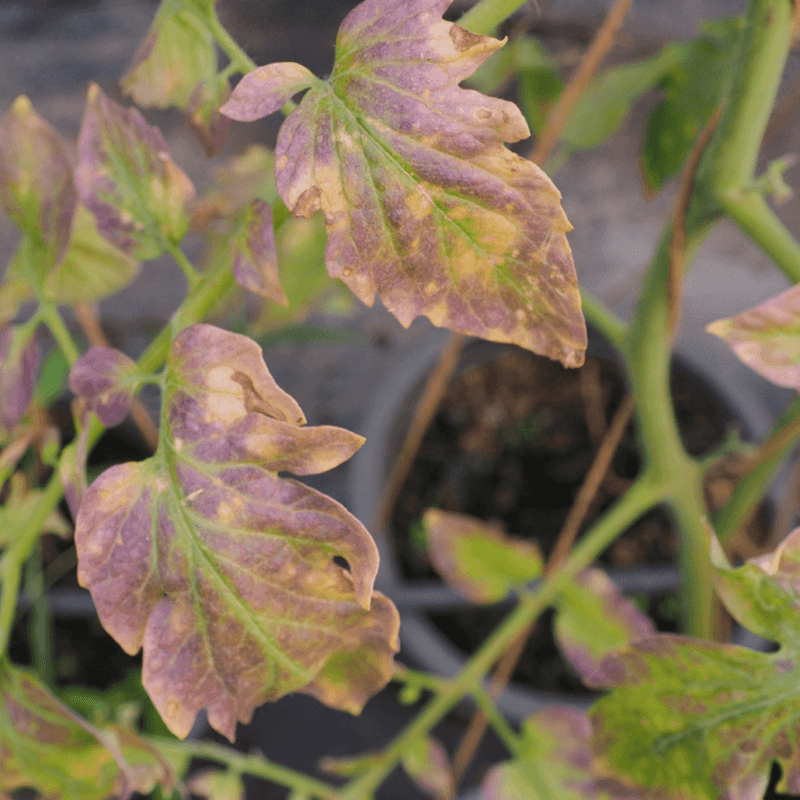
Tomatoes hail from warm climates, and a cold snap can leave them looking pale and unhappy even in summer. When nighttime temperatures dip too low, especially early in the season, the plant struggles to take up nutrients and the leaves may turn yellow or take on a purplish tinge.
Cool soil slows the roots down, so even well-fed plants can look starved simply because they cannot absorb what is there.
Wait to plant out until the weather has truly warmed and nights stay reliably above the low fifties. If an unexpected cold spell hits, cover plants overnight with a frost cloth or an upturned bucket, and remove it once the sun returns. Black plastic mulch or a wall-of-water shield can warm the soil around early plantings. As temperatures climb, cold-stressed leaves usually regain their color on their own.
16. Herbicide Drift Damage
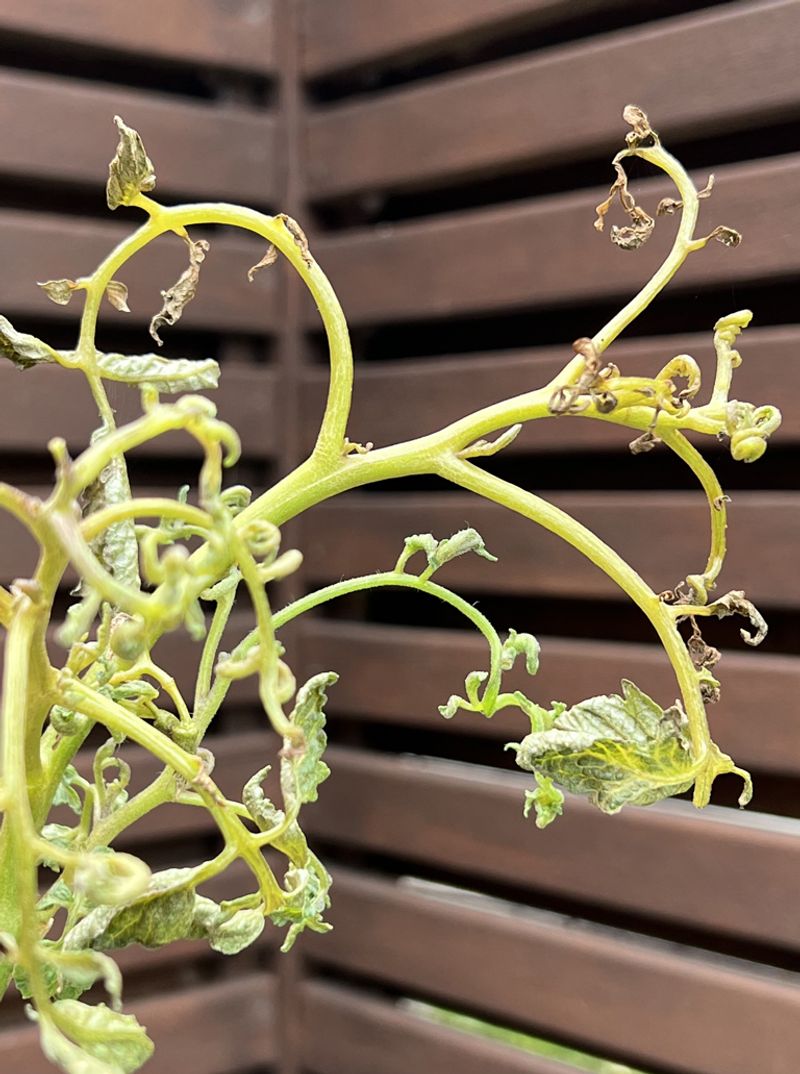
A sneaky cause that trips up even experienced gardeners is weed killer that never touched your tomatoes on purpose. Herbicide drifting on the breeze from a neighbor’s lawn treatment, or lingering in bought manure or straw mulch, can twist new growth and yellow the foliage in strange, distorted patterns.
The clue is in the shape: leaves often curl, cup, or grow narrow and fern-like rather than showing the even yellowing of a nutrient problem.
Stop using any suspect mulch, compost, or manure immediately, and water the plant well to help flush the chemical through the soil. Mild exposure sometimes grows out over a few weeks as fresh, normal leaves appear. Going forward, keep tomatoes away from areas where lawn products are sprayed, and ask about herbicide use before bringing in outside manure or hay.
17. Root-Bound Container Plants
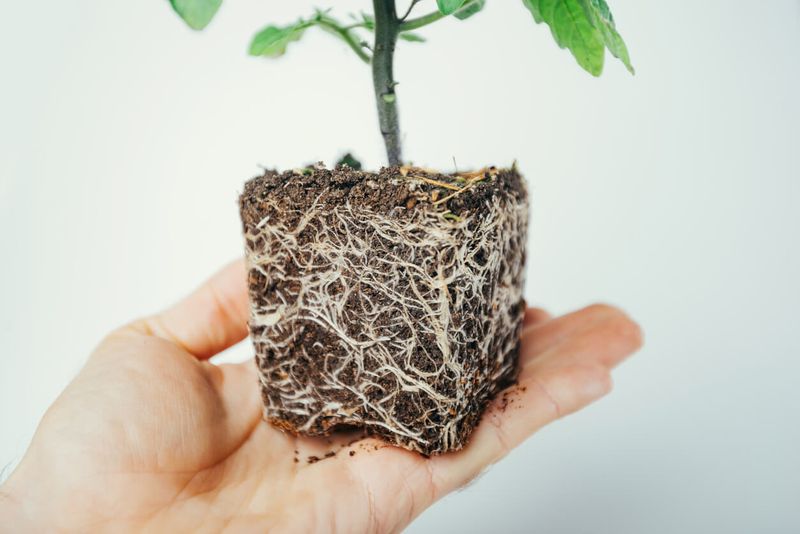
Growing tomatoes in pots comes with one hidden trap that catches many patio gardeners off guard. When roots fill every inch of a container and start circling the walls, the plant runs out of room to drink and feed, and the stress shows up as yellowing leaves that no amount of watering seems to fix.
Slide the plant out and you will see a dense, tangled mass of roots wrapped tightly around the shape of the pot.
The clearest fix is to move the tomato into a larger container with fresh potting mix, gently teasing apart the outer roots first so they grow outward instead of in circles. Tomatoes are heavy feeders that genuinely need big pots, ideally five gallons or more per plant. If repotting is not an option, top-dress with compost and feed more regularly to stretch the season while the roots stay crowded.